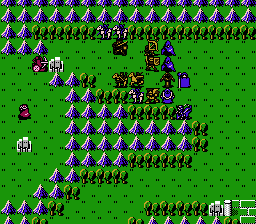
Stage 10 – Princess Minerva
“The fight at Teal Fortress.”
Marth sets out to save Maria in this stage.
 |
| The captive |
I sent most of my force around the building to head for the boss, while Julian and a small group went in with Marth to save Maria. I left Kashim on the fort to the east thinking that would block the reinforcements, but they come from the top of the map rather than the fort. This left Kashim completely alone vs. them, and he died. It was late enough in the stage and Kashim’s not a great character so I decided to move on despite the death.

Once Marth saves Maria, Minerva the dragon rider heads towards him to join as well. She explains that although Macedonia has mostly joined up with Drua, she wants to fight against them. She urges Marth to save Kachua, Paola, and Est, her underlings who will help in the fight. The rest of the stage is easy, as Excalibur claims another victim.
This map also has the first promotion item. When characters of certain classes reach level 10, they can use an item like the Hero’s Proof to advance to a new class. This resets their level to 1, and raises their stats to the base values for the promoted class if they weren’t there already. I didn’t have anyone at level 10 yet but I gave it to Ogma to use later. There’s also a speed ring. I decided to give the stat up items in general to Marth, since he has no promotion, the Rapier is a good weapon, and enemies tend to target him.
Stage 11 – Slave City Norda
“Marth frees the slave city.”
Marth heads to Norda to save Linda, who has the powerful Aura magic. This stage has the first appearance of the curious Shooter class, which is only in this game and the two remakes of it. It’s an attempt to combine the Armor Knight and Archer class, which is a poor combination.
 |
| Shooter |
The slave area is at the bottom right. After liberating it I spend quite a bit of time using the shops and storage unit to shift around items. Dealing with items is definitely one of the low points of this game; it’s far too difficult to trade and manage inventories. They should have offered a screen between games to do this.
After this I made a save state since I wasn’t going to repeat that again, and this is where I began using my “one save state per map” idea. I’ve found that this preserves enough of the tension and difficulty without having the extreme frustration of having to repeat 45 minutes of a map because of an unlucky critical hit or making one mistake in unit placement.

I did in fact have to reset once when I was a little too bold with my advancing and got swarmed. You can convince one of the shooters to join you, and the other one goes down easily with magic.
Now we have reached Akaneia, finally returning Nina to her home. But of course we’ll have to clear it of enemies first.
Stage 12 – Akaneia Palace
“The fight against Bishop Bozen in Akaneia Castle.”
Another castle map. The trick here is that you can only send out 10 guys because there are a bunch of heroes imprisoned in the palace, with no items.

The enemies there aren’t too problematic because the archers can’t hurt the armor knights. So that leaves us free to make our way through the castle. Once the initial enemies were cleared, I decided not to take the direct route to the treasure. I left Julian near the door and took everyone else around the bottom.

I had to load a state at this point because that sniper has a Silver Bow that I didn’t notice, and took someone out in one turn. But Marth with a Thunder Sword made quick work of him, and of course those two clerics are no problem. Mages are a bit tricky because in this game, everyone has a magic defense of 0, unless you use one of the items to increase it. So magic essentially does fixed damage. Even so, Bozen can’t take too many hits before dying. That General in the treasure room can’t open the door so he’s easy to pick off with magic from the other side. The only other thing to do is beat a Paladin on the right, who has the subtle name of Himmler.

One thing you sometimes have to be careful about is leading with a character who is too strong. Because if they can kill the enemies in one round (with two hits), they’ll keep taking damage over and over again. This game doesn’t let your guys’ stats easily get too high, and so someone can die pretty quickly if you’re not careful.
After the stage, Nina gives us the bow Palutia, which has a limited number of uses and a high weapon level requirement. There are two other good weapons like it: the Gladius, and the Mercurial Rapier, that we should come across later.
Stage 13 – The Wooden Horse Army of Gurunia
“The army encounters the Gurunia Army in Menidi.”
This stage was cut from the SNES re-release and it’s not hard to see why. 15 Shooters. Fifteen.

Some people use warp staffs to deal with the stage. What I did was go forward on the middle path, taking out the shooters there, and taking Marth to the village to recruit my own shooter (who can’t leave the cliff area he’s stranded in). Media recruits Astria, the swordsman. Now I had this position:

I had given Marth the Boots from a previous level so his move is 11. Marik moves forward and kills the Shooter boss with Excalibur, then Marth moves to the castle and takes it over, obviating the need to deal with that wall of shooters in the back or the shooter groups at the top and bottom.
Stage 14 – Gura, the Land of Sorrow
“Marth attacks Gura, the land that betrayed Alitia.”
As given in the intro story, Gura is the land that betrayed Marth’s father. Although Marth doesn’t have any dialogue in this map so I guess you have to invent your own story of his revenge.

After getting the magic spell from the village on the top left, the next step is to take out all those annoying archers and the priest. Meanwhile Kachua and Paola appear on turn 5 and head towards Marth, joining the team.
I guess I took too few screenshots of this stage. The bottom part of the map seems easy, but I actually had to load my mid-save stage twice. Once was because the Armor Knight got a critical on Abel and took him from full HP to 0 in one attack. The other was due to the Pegasus Knight reinforcements that start coming in from the left. They do a fair amount of damage; probably if I had shooters out there they could tank it. Winning the stage before too many of them come is easy enough, but the right side has two chests, including the all important Silver Card, which halves the price of items. The tedious and cumbersome item interface makes this less appealing than it would otherwise be, but it’s still a good item.
So we have now taken back Gura, but the Falchion is not there. Apparently Garnef has taken it and fled, so it’s time to follow him to the desert — we can’t beat Medius without the Falchion.