Monthly Archives: September 2019

SFC Game 39 – Wondrous Magic wrap-up

The main thing that stands out about this game is the real-time battle system. While this does set the game apart from the other cookie-cutter games coming out around the same time, it has some problems. It tends to be very hard to tell what’s happening in the battle, especially since you have 3 AI-controlled units and then enemies on all sides. It’s difficult to know who is hitting you, who is causing the poison, etc. Healing can also be tricky. The controls for using magic and items are unintuitive and I felt like I never really got used to it.

Maybe this is why so many games fall back on the cookie cutter AMID system — it’s not great, but at least the designers and players know what to expect and it’s not very risky.

The story sequences have good artwork to go along with them. I wish a lot more games did this rather than just sticking with the sprites. It gives you a lot more feel for what the characters look like. The rest of the graphics are fairly decent as well.

The game requires too much grinding for my taste. Most of it can be done while exploring the areas, but especially at the end, I had to grind quite a bit to finish the game.

Overall the game is somewhat worth playing. Here’s my ranking system again:

A – These games were truly enjoyable, I had fun playing them just as games, not for the blog.

B – These games were average. I found them boring at times, and it was mostly the fulfillment of completing the game for the blog that carried me through. My overall experience with the game wasn’t terrible, it’s just not a game I would have finished all the way through for fun.

C – These games were painful to finish, to the point where I wanted to give up despite the blog, and had to force myself to play through (sometimes using cheats) just to move on to the next game.

I would give this game a B or maybe a B+.

Next up is the PC Engine version of Ys IV, a game I’ve wanted to play for a long time. I’m currently playing a real-time strategy RPG for the Super Famicom on my other blog, Hiouden: Pact With the Monsters.

SRPG Game 23 – Hiouden: Pact with the Monsters (SFC) (Stages 1-7)

Hiouden: Pact with the Monsters (緋王伝 魔物達との誓い)
Release Date: 2/11/1994
System: Super Famicom
Developer: Wolf Team
Publisher: Enix

I originally didn’t have this game on my list, but when I was evaluating it to see if it was an RPG (for my other blog), I realized it was actually an SRPG I had missed. It’s by Wolf Team, which later will develop the early Tales games. It has music by Motoi Sakuraba, who had been working with Wolf Team for a while.

Hiouden is a series that began on the PC-98; three games were released from 1992-1994. This Super Famicom game is not a straight port of any of the PC-98 games, although it follows the same basic story idea. A wicked minister has betrayed the king, and his son escapes, but then turns back with summoned monsters to have revenge on the minister. The title “Legend of the Scarlet King” seems to refer to the blood-drenched Prince who takes revenge via the monsters, although the narrator tells you at the beginning this is not true.

The game supports the SNES mouse, and the controls are surprisingly well done — it’s hard for me to come up with places where I think they made bad decisions within the limitations of the Super Famicom.

So let’s get right into it

Stage 1

You start at the top of the castle, which connects to a garden. A dryad named Beatrix appears and gives Richard, the prince, a ring that lets him make contracts with ancient monsters that have been sealed within statues in the castle. This stage is basically a tutorial, that shows you how to move, open chests and doors, get monsters, equip things, fight, and such.


The battles happen automatically when your guys encounter the enemies. There’s not much you do to directly control them; you can set an overall tactic to have them retreat, fight to the death, withdraw injured characters, or rest. You can change the order in which the magicians will prioritize their spells. By clicking on the hourglass in the bottom right you can pause the game which is very helpful; this allows you to use items and redirect your characters.

Every squad you defeat gives a chest, which has food and other HP restoring items, and equipment.

The stage ends when you reach the stairs down to the next floor. The whole game seems to take place within this castle.

Stage 2

You have three minutes to cross the bridge. There’s a healing floor at the beginning to go back to, but I didn’t find this necessary. I used one or two healing items and was able to beat the stage.

The map view is convenient because you can issue orders even there — you can also split the screen between two parties, or between a party and the overhead map.

Stage 3

This stage has several corridors with arrows that shoot out. If you feed a statue some apples it will tell you that you need to leave one party on the switches to turn the arrows off while the other party fights the monsters. We also get the third group in this stage.

Stage 4

There aren’t any healing floors here so you have to use the rest (click on the sword until it turns to ZZZ) to regain HP. We also find the Mattock here which can break down certain walls.


The stage ends with Richard and party opening a switch to release water, which washes them down right into the middle of a bunch of monsters including a large boss!

Stage 5

This is an all out fight right from the start, surrounded by a lot of enemies, so I’m not sure there’s much you can do to strategize. The characters will blink red when they are low on HP. If you check their status screen it will show what food they like, and if you give them that it restores all their HP. I also have a bunch of magic items, but Nicovideo comments warned against using them early in the game because the later stages are so difficult.

Stage 6

The manual has brief descriptions of the first 6 stages. It warns you here that you should keep the average level of your units high, I guess meaning that it’s not going to work to just use one or two squads. So I used my weaker units entirely on this stage.

This is the stage where I started getting promotion items. They can change your characters’ classes — zombies into skeletons, serpents into dragons, etc. There are additional class promotions later on.

Stage 7 

This is the stage where we take down the evil Minister. This requires going through a complicated set of doors that open with different keys, taking down reinforcement enemies, and finally taking on the Minister and a big group of enemies. I used my lower level guys and by the end of this pretty much everyone was in the 15-17 range.

I should have made sure to get all those chests, but it shouldn’t matter too much. The Minister tells us that he rebelled because Richard’s father wasn’t a good enough king, and that we need someone stronger to deal with the surrounding empires. Now that Richard can become the “king of monsters” maybe he can do it? Anyway, time to delve under the castle to find the Sword of Kings before Richard decides what to do.

There are only 20 stages in the game, so it’s not especially long, but the stages could get longer as we go. So far I’m enjoying this game; I recommend giving it a try with the translation patch.

SFC Game 39 – Wondrous Magic (Finished)

I finally succeeded in getting what I needed in the ruined town. At the bottom, we find Kurisu’s father, but he’s dying. He was trying to stop Irion from reviving the evil god Ivas, but he dies. He does give us the item we need to kill the vampire, though.

The next dungeon is harder because you can’t warp out of it, so you have to be a lot more cautious in exploration. I had to move up a few levels while exploring until I reached the vampire lord.

He’s tough; he separates into bats and then poisons us. Kurisu mostly had to do healing duty, but eventually I won. Now we have the last part of the staff we need to revive the goddess.

Time to do the ritual!

But no, Irion comes in and destroys the staff, also hurting Kurisu.

Now the remaining members have to go out and find a way to restore Kurisu, which actually just involves repairing the staff. The Dwarves send us on a few fetch quests to do this, one of which involves going to a Hobbit village (the Tolkien lawyers can’t read Japanese). One of the Hobbits wants a lottery ticket; you can’t solve this subquest until very late in the game and all it does is give you an item that increases your XP by 1 when you use it.

So let’s just take the staff, go back and restore Kurisu, and continue on. Now that we have the staff, we can finally bring the goddess Shurel down.

  Unfortunately she doesn’t have much power, so all she can tell us is go seek out the Elves to fully restore the power of the staff. This involves going to an island, with the help of mermaids.

The mermaid sends us on a fetch quest for a flute to calm the seas so that we can go out on a ship. The tower isn’t too tough, but once we go out in the ship there’s a hard octopus boss. I had to level a bit to beat him, but finally we’re to the island. The island holds an illusionary garden where only magic users can go, so we lose Soldick for a while in favor of a useless elf. This dungeon also required a lot of grinding and leaving the dungeon.

Eventually, though, we recover the power of the staff, and it’s time to head to the final dungeons to defeat Irion and prevent the evil god from returning.

At this point I used a cheat code to level a bit because it was clear that I was going to have to do at least 10-15 levels of grinding to beat the game. There’s an optional dungeon that has some useful equipment in it that I cleared next, and then it was time to go to beat Irion.

We also learn here that the one who was going to revive Ivas was not Kurisu, but the other character I have (Fredia) who is actually Kurisu’s brother. Irion stole his arm (!?) to weaken him, but having beaten Irion he gets his arm back and is back to full power.

Unfortunately beating Irion is not enough because Ivas has already returned. So one more dungeon to go.

Ivas himself appears in two forms — a human form, which is not very hard, and a demon form, which is. Fredia has to keep one part of the demon form occupied while the rest of us take on the boss.

I leveled to 50 (max) and still had a hard time beating him. Using items is very awkward and so it was hard to keep people healed and revived, but I did win after many tries.

Ivas is destroyed, the goddess’ power comes down, and we win! Kurisu heads back home to be a local healer. Fredia seemed to have died, but…

In the end he survived.

This is a pretty average game, wrap-up will be next and then Ys IV for PC Engine.

SRPG Game 22 – Majin Tensei (SFC)

 FACTS

  1. Turn type: Player turn/enemy turn
  2. Maps: Medium to large. There is terrain that gives bonuses.
  3. Character Customization:You can combine monsters to get new ones.
  4. Character Development: Standard XP level system for the two humans, an 8-tier system for the monsters.
  5. Party Size: I don’t remember what the max size is.
  6. Equipment: You can equip 6 things at a time, I believe.
  7. Game Flow: There is an overworld map and some stages are optional. You can replay indoor dungeon/cave stages.
  8. Saving: In battle only.
  9. Death: Permanent.

 IMPRESSIONS

I played this game some years ago so I’m not going to play it again because it’s rather long. This is one of the games in the long-running Megami Tensei franchise. They adapted the system to an SRPG style, and while it’s rough in some areas, I liked it overall.
The story is awful. I assume there was some backstory given in the instructions, but beyond that the game has almost no plot — to the point where it almost fails the criteria I have that these games have to have a developing plot.
The gameplay is much better, though. As in other MT games, the main character can convince demons to join the team. These can be levelled up (max 8) and then combined with other demons, and they will bring over the skills they learned. This allows you to get some customized demons. The demons come in 8 varieties, and each variety has a different compability (in attack/defense) with other types. This means you can’t just rely on a few powerful demons, but you have to have a somewhat varied party to deal with the monsters you encounter.
I remember the game being fairly hard at points, because you would get swarmed by monsters, and it was very hard to stop them from surrounding or ganging up on particular characters. One thing that made it a bit easier is that losing a demon is not always terrible because you can convince new demons that might be more powerful than the one you lost. Like all the early MT games, the demon recruiting is basically random.
If you’re a MT and retro game fan I would recommend at least trying this — a patch has just recently come out for the game. I’ve heard that Majin Tensei 2 is much better and fixes a lot of the problems this game had. We’ll see when I get there, and it may be that with MT2 out there it’s not worth playing this one.

SFC Game 39 – Wondrous Magic

Wondrous Magic (ワンダラスマジック)
Released 12/17/1993, by Ascii
There are three more games to go for 1993 (plus one PC Engine game). This is another minor game with no translation patch. 

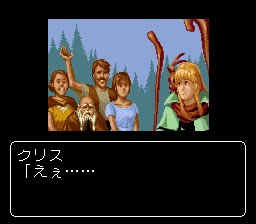
The story opens with a child, Kurisu, wanting to go find her father and bring him back to her village. He left when she was very little. Her grandfather persuades her to wait until she turns 16 and then she goes with him. Meanwhile there’s a general backstory that the Demon god was defeated by humans with the help of magic, but then she vowed to return in the 100th descendant of one of her minions.

The story sequences have good graphics; I’m always surprised that more RPGs didn’t do things like this, since the quality of the sprite graphics was so limited.

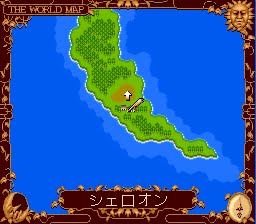
Neither the towns nor world map are explorable, you just choose a location and go.

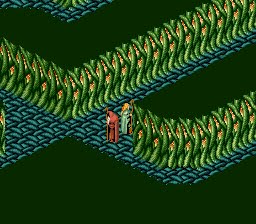
The forest outside the town is the first dungeon area. In the areas you can hold down Y to run, and press B to jump (or hold it down to keep jumping); as far as I know the jumping has no actual effect, it just looks funny if you continuously hold it while moving.

Encounters are random, and the battles take place in real time.

The green bars on top are the HP of Kurisu and Linkel. The middle shows the monsters (you use L and R to switch, sort of like Aretha). The grey box to the right shows the last action the character took, and will turn brown when they get to act. You act with the buttons — Y attacks, holding down A brings up the magic menu when you can then cast with B, and holding down X brings up the equipped items (you can see the bread in the picture) and then B uses it. The large green bar on the bottom is the total HP of the enemies. The system works OK, but I feel like even having played half the game, I’m still not fully used to it.

You can put your characters on AI, which I did — they don’t always make good decisions but I can’t imagine trying to control all four characters in realtime (using select to switch between them).

You can also run away from fights with 100% chance if you have a way you can go that is not blocked by an enemy. Losing all characters results in a game over and you reload from your last save.

Of course given the title of the game and the characters, it’s obvious that magic is a big part of the game, although Kurisu only starts with Heal. There are two types of magic, one that uses your HP, and another that uses MP. You can equip 9 spells at a time for use in battle. The spells level up sometimes when your character levels up.

When you defeat a monster, you get XP and Onyx. There are two forms of currency — Onyx, which the monsters drop, and then Bezera which you get from selling things and from chests. This part of the game confuses me because there seems to be no purpose to the two currencies. At least in the half of the game I’ve played, every shopkeeper accepts both currencies and you can change them freely, and there’s a set 10 bezera = 1 onyx rate. There are even expensive items that change all your bezera to onyx. It makes me wonder if this was something that was intended to work differently but they ran out of development time or changed their minds.

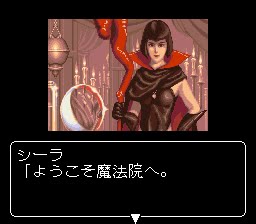
In the next town we meet Shira the magician who teaches Kurisu some magic and then puts her on a test to become a real magician —  recovering a stone from tower.

Kurisu has to fight by herself in this dungeon. You often enter dungeons very underpowered, but levelling goes pretty quickly, and I mostly found that simply exploring the dungeons to find the chests and using the escape items/spells when I was too damaged provided enough level gains to proceed. So far I’ve only had to spend a slight amount of time running in circles fighting.

This dungeon itself isn’t hard but once we finish it, a dragon appears when we try to leave the city.

This required some grinding, but at least Linkle joins the fight. Kurisu’s frost magic can freeze enemies, so switching back and forth between the heads and freezing them is a good strategy. Once we return to Shira’s magic school, she’s gone. Linkle suspects that it was actually Shira herself who summoned the dragon to attack them. After questioning the king we move on to the next town to follow Shira. A knight named Soldic joins — he’s 54 years old and Linkle is in his 60s; this might be the oldest RPG party I’ve seen.

In the next town we encounter the mage Zaifon, who reveals what’s actually going on. It turns out that Kurisu is the 100th descendant of Ivas, the demon god. This is why Shira tried to kill them. Zaifon gives them a chance, though — if they can find three parts of a wand they may be able to stop Ivas from awakening, in which case Zaifon won’t kill Kurisu. We get a fourth party member, a magic knight (who dies a lot); he’s only 16.

Off to find the first staff, which is in this town. The dungeons are increasingly mazelike and confusing.

The spellcasting menu

Afterwards we have to take an underground passage to the Dwarf village. They agree to let us into the place with the next staff piece as long as we defeat a big crab in the desert.

After that, we get the next staff and move on. At Zev, there seems to be a Baron (who might be a vampire) who destroyed a local town and takes sacrificial victims. The first thing we have to do is go to the ruined town, and then take on the castle to beat the Baron. This is where I am now. As I said, it seems to be around halfway through the game, so this isn’t a very long game. The ruined town had tough monsters but I’ve moved up 4-5 levels just exploring the area so hopefully I can get through it next time.

SRPG Game 21 – Fire Emblem: Mystery of the Emblems wrap-up

 FACTS

  1. Turn type: Player turn/enemy turn
  2. Maps: Medium to large. There is terrain that gives bonuses.
  3. Character Customization: None.
  4. Character Development: Standard XP level system, with promotion at level 10 with an item.
  5. Party Size: Typically 12-15 units on a map although you get many more.
  6. Equipment: You can equip one weapon at a time, and have 3 in reserve. There is no other equipment.
  7. Game Flow: You play stages 1-20 in sequence, no repeats, and if you fulfill certain conditions you can do the last two stages.
  8. Saving: Between battles.
  9. Death: Permanent.

 IMPRESSIONS

I think that with this remake of FE1 and the new scenario, FE has finally hit its stride. This is the first FE game I would recommend even to Fire Emblem fans — it’s still lacking a number of things that are in later Fire Emblems, but it’s playable in a way that the first two aren’t.
Part of this is the massive interface improvements, including skippable animations, inventory management between stages, and being able to see enemy movement ranges. The graphics are also of course much better than the Famicom games. The difficulty of this game is a bit uneven, though — the first stages are the hardest, and the game gets easier as you go on.
The story is still fairly simple, although there is more dialogue and a somewhat more complex plot than the first games.
I mentioned in one of the posts that one thing I really appreciate about FE3 in comparison to other games I’ve played is the variety in the stages. It’s not just “defeat all enemies” and you move your guys through the stage. You have to stop thieves from destroying villages, convince enemies, avoid killing certain things, open doors and chests, and such. 
I still feel that at some level FE just isn’t for me. I find the permanent death too frustrating — the only way I can play these games is to use save states. I generally limit it to one save state per stage so that I’m not just playing casually and resetting any time I make a small mistake. But I can’t deal with playing 30-40 minutes on a stage and then having to start over because I made one careless move or one mistake.
It’s two years before the next FE game so that will be a while in the timeline of this blog.

SRPG Game 21 – Fire Emblem: Mystery of the Emblems (Stages 20-end)

Stage 20

This stage started out kicking my butt. I lost probably 15 times trying to just get through the first corridor, because of all the Worm and Meteor users (distance magic).

The solution is just to ignore this top part. The chest is a Lady Sword, which might provide some minor help in the next stage but is not worth it. I was also assured by people on Discord that the Silence staff is best used in this stage. So I made my way down, using Silence to prevent the mages from sniping characters. I also made use of the enemy thief to open the door before I killed him.

Take out these guys, then get all the chests and move down to the bottom.

Once you enter the bottom area, reinforcements start coming and the enemies attack the captured character there to the right. I had my character with the Mercurius Sword and the Light Orb take him out in one turn and then moved Marth to capture the throne before anything else could happen.

At this point if you didn’t get the 5 orbs the game ends. Otherwise, we go on to the final stages. Unfortunately you lose all the orbs now.

Final Stage 1

My main goal here was to move fast, because in 12 turns reinforcements start coming. The stage itself is not that hard; nothing attacks until you get in its range, and the thieves take a long time to cross the mountains so you can take them out with winged units. The main danger is that all of the barbarian units have Devil Axes, so they could kill someone with a critical. This didn’t happen to me, and Marth with the Boots was fast enough to get up to the town to get Starlight, and then back to the castle to capture before turn 12.

Final Stage 2 

This stage is composed of three parts.


For the first part I used Warp to get Julian up to open the door, then I had Feena dance for the warp user. He then warped Marth up to the boss. Marth killed the boss, then I used the Again staff (which gives all units who have already moved another turn), and then finished the part.

For the second part I warped my mage with Starlight up to Garnef. He attacked. Then I used the Again staff (2nd of 3 uses), attacked again, killing Garnef. Feena danced for the warp user and then Marth got warped up to the throne to end this part.

For this part you need to either kill or persuade the four priests around Medius, and then kill him. The Earth Dragons get removed from the board every turn, but this still means they get one set of attacks on the enemy turn. Once I had the setup in the above screenshot, I used my final Again staff to give the persuading units another turn (I was worried they wouldn’t survive the enemy turn). Then Marth attacked Medius with the Falchion. Chiki went next, and Medius was left with 8 HP. I could have beat him in a number of ways but I decided to have Feena dance for Chiki, who delivered the killing blow.

The ending shows you the number of turns you did each stage in, as well as what happens to each character (just like FE1). One nice touch is that it shows the number of times each character died, even if you reset after the death. My favorite one is my failed attempt to use Doga.

And that’s FE3.

SRPG Game 21 – Fire Emblem: Mystery of the Emblems (Stages 15-19)

Stage 15

Marth returns to his land. The main difficulties are just knowing when things will happen (e.g. the reinforcements) and not getting in range of the Shooters.

Est is captured there but the General inside won’t attack her so she’s fine until the cavalry arrives. I sent Marth around the side to visit the towns and had everyone meet up at the bottom. Abel joins our group and then we kill the boss.

Stage 16

Now we’re inside the castle. This stage reminds me of a book 1 stage with a lot of treasures but it’s not as hard. I lost a couple of times on the left side (just as I did in FE1) but once George can convince Astria, the stage gets a lot easier. I had Marth take out most of the enemies on the left side.

Fortunately in this game, thieves that steal treasure boxes will drop that treasure once they’re killed. So it’s a lot easier to deal with them in stages like this than it was in FE1.

Stage 17 

This is a simple stage because over half the enemies run away from you since they belong to the Gura kingdom. I didn’t get a screenshot, but as long as you don’t kill any of the Gura troops, the boss will join being persuaded by Marth, and then she can persuade the unit next to her.

Stage 18

This is yet another stage where most of the units don’t attack you. It looks bad at the beginning:


Fortunately all of those paladins and horsemen move to the top and don’t attack, otherwise this stage would be considerably harder.

This is the main force, and is fairly small. The shooters can cause some havoc but with Armor Killers and Rapier it’s not too bad. There’s a secret shop that I bought some promote items from.

Stage 19

Oh god this stage sucked. I think I had to reset close to 20 times.


This center area is full of shooters and bishops with Worm magic. You have to take some of the forces through a pass to avoid them, and then go up and around. Then it’s a challenge to beat all these enemies without anyone dying. Do not approach the castle because if you step on a square next to the castle, reinforcements start coming out of all the forts.

I made a save state once I had gotten up on the right and most of my state loads came after that, trying to break into the center area.

Chiki and Banutu work differently in this game than they did in FE1. They transform into actual dragons, which makes them much more useful.

Next update will hopefully be the last.