Monthly Archives: July 2018

PCE Game 20 – Gensou Tairiku Auleria

Gensou Tairiku Auleria (幻蒼大陸オーレリア)
Released 2/26/1993, published by Taito

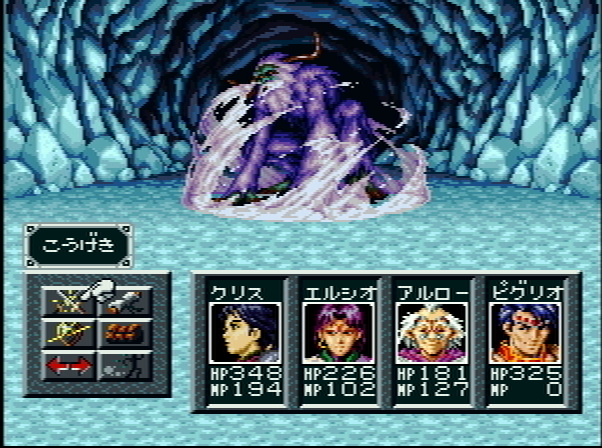
This is going to be a fairly short post because I have run into emulation errors, or perhaps a bad dump (although someone else has submitted this game as a bug in mednafen). The game is an action RPG that has a 2D platforming style, sort of like Exile. It is just as deadly as Ys, with enemies able to kill you instantly if you get too close. However, you can only save in towns, which increases the difficulty. One distinctive feature is that if your level is high enough, lower level monsters will not appear. So this prevents you from overlevelling but has the side effect of limiting the amount of money in the game — something one of the walkthrough sites warns about.

The emulation problem is that the movies don’t play, or only a few images show from them. The game starts with a rather long opening scene, of which only a few parts can be seen (but the dialogue is audible). I watched this movie on youtube to begin.

The backstory is that Auleria was a world where different races lived in harmony, but then the king was killed and five continents took their own routes, although the peace was kept by an alliance between the kingdoms. The story begins when a war is about to start between the kingdoms. One of the lords, Albert (who is a monster of some kind), is visited by a prophet Georg, who seems to be telling him that he can defeat the other kingdoms, starting with the weak “mouse” kingdom (just a metaphor).

Albert’s forces head out, as we switch to the main character. He lives in a little town; we see his friends and family, then he heads out to buy medicine from an nearby town. Of course while he’s gone the enemies destroy the town and when he gets back, the entire place is a burning mess and everyone is dead. So the main character heads back to the nearby town to find out what happened.

After poking around in the village, he heads off for the castle. Michael, the one survivor, went there to tell the king what happened. This is where the action starts — it’s just swinging your sword, basically. There’s an MP gauge that lets you charge up and shoot some fire from your sword, but I didn’t find that very useful.

At the castle, our hero learns something of what happened (just that 5 magic monsters came to destroy the town). Michael tells him that his younger brother Karl might fight with the hero. But Karl says he wants Michael to come home first — Michael has headed off to a cave, which is the first dungeon.

I died a bunch of times in here, but after levelling and upgrading my gear I finally found Michael. Now Karl joins the team. At this point the game becomes a bit easier because you can switch between the hero and Karl, each with their own HP gauge. The next goal is to be able to pass the barrier to the next kingdom, but first you have to do a sidequest involving a crooked weapons dealer. This requires going back into the cave and exploring new areas and beating a boss. But after this a movie played that I couldn’t see again, and I thought that was good enough.

It’s too bad the emulation didn’t work, but this isn’t that good of a game anyway. Next up is Tensi no Uta II, the sequel to the 1991 game I played earlier. There’s also a slight change — I think I’m going to skip Laplace no Ma for the PCE and play it when it comes up on the Super Famicom instead (despite being in some ways a different game). But I had Tengai Makyo Fuun Kabuki Den in the wrong place so that will be after Tenshi no Uta II.

SFC Game 27 – Silva Saga II Review

At the end of the last post I said this was a thoroughly average game — it’s perfectly playable, but hardly anything will wow you.

Story/Characters: This is a weak part of the game. The characters barely exist, particularly your frequently rotating party members. The story is cookie cutter with no real twists, even in places where you might expect twists.

  
World: Standard fantasy world — a little disappointing from Yuto Ramon because GDLeen at least had some innovation but this is just like any other generic RPG world.

 
Game Flow: Quite smooth. There are few places where you would even think of grinding,and it’s never impossible to figure out what you should do next.

System: It’s mostly standard AMID, although the three parties (see intro post) keep it interesting. It’s fun to try to level the mercenaries and jinzo because you have to be careful about which enemies you let them beat up on. You could easily beat the game without ever hiring a mercenary or getting a jinzo, but it wouldn’t be as fun.

Side Quests/Optional Content: There are some optional jinzo you can get through some bosses and other stuff, but that’s it.

Interface: I’m hoping that we’re moving into an era of more modern interfaces. This has pretty much everything I would expect — you can see the stats of equipment before you buy it, no inventory limit, easy equipment interface, etc.

Graphics/Sound:The graphics are underwhelming. While the enemy sprites are decent, the rest of the graphics still look like the Famicom-era ones of the early SFC. The music is pretty good, though I didn’t find any particularly memorable songs.


Next up is the final set of 3 PC Engine games, then I will be caught up to where I am with SFC. The next SFC game will be Madara 2.

SRPG Game 1 – Fire Emblem (Stages 23-25)

I have to admit at this point I was getting a little tired of the game so I tried to see if I could use the Warp Staff to power through the last stages. It sort of worked, but there were a number of unforeseen hiccups.

Stage 23 – The Evil Priest Garnef
“The final fight against Garnef in the legendary city of Thebes.”


I gave Marik the starlight magic and had him warp up next to the throne boss, although I noticed later that Marth was able to hurt him with the Mercurius as well. Since Marik would die and Marth wouldn’t, I just sent Marth up to the top to finish the stage. This would later bite me in the butt because there are several fake Garnefs, and the one on the throne is not the real one. So I beat the stage without getting the Falchion, which is all but necessary to defeat the final boss.

Garnef is defeated, and can’t realize his goal of defeating Medius himself. But he mocks Marth as he dies. Now Marth’s sister Ellis finally appears.

She has a resurrect staff, which can be used in the next stage.

Stage 24 – The Kingdom of the Mamkute
“Drua Kingdom. This was the kingdom of the Mamkute people…”


This stage is easy to warp clear; I sent Abel down there with a Dragon Killer to deal with the boss and then moved Marth in to the castle. There’s a place to resurrect dead people below but the only one dead was Kashim (from way before) so that didn’t seem necessary.

Stage 25 – The Chosen Ones
“The fight against the Dark Dragon Medius. Marth’s last deciding battle.”

This is the last stage, and it’s a tough one. Not only does it have strong grunts with reinforcements, but your team starts off split into four and dispersed around the map. You have no direct way to control the placement. Also this is where I noticed that I did not have the Falchion. Fortunately I had a save state back on stage 23 that I could go back to and beat the real Garnef. In doing so I lost Marik, but that seemed a reasonable price to pay.

Second problem was that none of my mages started near Marth. Someone on the Discord reminded me that if Marth has a Warp Staff, he can pass it to Gato, who joins on this map and appears near Marth. So I went back to stage 24 to do that.

Even then it didn’t work. Marth got killed before he could even face Medius, who is behind another powerful Mamkute.

My next effort was to first send Abel there with the Gladius. Although he was not able to kill the Mamkute, he killed both of the Snipers, which was very helpful.

While this was all being set up, everyone else on the map died except for Gato and Sheeda. This left Marth alone to face off against Medius, with a lot of casualties in the final battle.

The Falchion is a fairly weak sword, but it does have a bonus to damage against Medius. It took me two turns.

But Marth was victorious! Of course Medius gives the usual bad guy speech about how he’ll back some day as long as there is evil in the hearts of men, blah blah.

Sheeda managed to survive so Marth proposes to her (there’s a different scene here if she died, where Marth says he’ll never forget her. Now we get the English ending scene:

I’m not sure what that last sentence means; if they were referring to Fire Emblem Gaiden or not. A lot of games from this period say something like this at the end so it might not mean anything. Next up is a cast list that shows some odd romanizations for characters.

Next up is a list of all the stages and how many turns each one took, followed by your final turn count. This is a nice touch.

Finally, there’s a short description of what each character does after the war. If they died, it says which battle they died in. Another nice touch.

And that’s the end!

I’ll post in a few days with some sort of wrap-up or review post but I’m not sure exactly what it will look like yet.

SRPG Game 1 – Fire Emblem (Stages 20-22)

Stage 20 – Black Knight Camus
“In Grunia, Marth fights the Black Knights of Macedonia headed by Camus.

In the longest pre-battle dialogue of the game, Nina tries to convince Camus to join the heroes, but he can’t leave his dying kingdom even though he disagrees with Drua.

This stage has a fairly tough opening because of the four paladins to the left.

It’s not that hard to kill them, but because of their high movement range it’s tricky to keep everyone alive. It’s easy for them to go around your troops and kill weak people. In my final play I didn’t open the bridge until I had beaten those initial enemies. Marth then has to run down to the left for the Harman (Repair) staff in the house, which I never actually used.

Another enemy character falls victim to Sheeda’s charms and joins the party.

Camus himself can be pretty hard. He has the Gladius, the strongest spear in the game. This is the kind of fight where I feel the permadeath is particularly unfair because if Camus gets a critical hit, he’s going to kill whoever he’s fighting except maybe someone at max level who has a ton of stat upgrades. I got lucky and beat him. The Gladius is good to give to a Paladin, particularly along with the Star Orb, which makes the holder’s weapons not lose uses when they attack. Although the Star Orb is also really useful for Marth because the Mercurius Rapier is the strongest weapon in the game for him, and he can do a lot of damage with unlimited uses.

After the fight, Marth apologizes to Nina for not being able to save Camus.

Stage 21 – Deciding Battle at Macedonia
“A difficult fight at the border of Macedonia.”

This is another map that was removed from the SFC remake.

The trickiest part is at the beginning, because all the monsters except the Paladins come for you at the beginning. Like the previous stage it’s not hard to defeat all the enemies, but the Dragon Knights have such high movement that it can be tough to prevent them from killing anyone. Also your characters start separated on the map. I had three archer characters to deal with the knights and the reinforcements, but I had to try several times until I got it right. But once that initial force is beaten it’s no problem because the Paladins can be lured down individually.

There’s a secret shop on this stage in the mountains, that sells stat up items. Unfortunately you can’t buy things at shops and send them to the storage, so it’s tough to use. I just bought two things and moved on.

Stage 22 – The Knights of the Sky 
“The deciding fight against a large band of Dragon Knights in Macedonia.”

I brought archers to this stage. One of the paladins is Michel, the older brother of Minerva and others, but he can’t be recruited unfortunately. I played quickly here, first because you have to get to the village with Marth before the thief can destroy it. Marth has to bring the Star and Light Orbs to get Gato to make the Starlight, which is the best way to defeat Garnef. Apparently if you go there without the orbs, Gato will suggest using the Mercurius Rapier, the Gladius, and Devil weapons to try to beat Garnef instead, but he suggests basically starting the game over instead. Ouch, that’s harsh!

The other reason to play quickly is to stop the reinforcements by blocking the six forts. Once I did that, I sent some units to the top left to buy stuff, and then ended the stage.

After the stage, Morodof announces that they found Thebes, where Garnef is. So now we can make our way there to recover the Falchion! In the next post I’ll cover the last three stages.

SFC Game 27 – Silva Saga II Part 2 (Finished)

This is a fairly short game, so I was able to finish it up in two posts.

The three party system makes the random battles a little more interesting than the usual “mash attack” — trying to level up the mercenaries and jinzos is fun, and they can act as meat shields in the battles as long as you don’t let the mercenaries get killed. I was pretty successful until the very end. My very first hired person, Elmina, died on the last dungeon and I had to replace her. Sniff sniff.

Last time Kurisu had become the Hero of Light. The next major task is to find Milfa, who was one of Kairal’s original companions — we’ll never reach the final dungeon without her. Unfortunately she was sunk along with the city of Olotria, so the first task is to head up north into the snowy fields to find Endra, one of the other warriors who traveled with Kairal. Since Arlaw has already joined us, that will be the complete party (I guess maybe these 3 were in Silva Saga 1?)

The snow sled

The enemies in this part of the game taken a sudden leap in difficulty, but I actually found it doable without grinding — they give a lot of XP, and with judicious switching between the parties I was high enough level by the end of this dungeon to be able to beat the boss. One odd quirk of this game is that all the bosses, even the final boss, can be poisoned. They only lose 50 hp per turn max but every little bit helps.

The boss

Now Endra joins the party along with underwater gear that will enable us to reach Olotria. Only one thing left — we need a ship! Fortunately the mayor of a nearby town is happy to grant one to the Hero of Light. Now we can reach Olotria, but before that, let’s go back to Kurisu’s home town and find out what’s his deal.

The destruction of Dolun

Actually there’s really no story there — Kurisu left Dolun to try to defeat Zolde but his ship was destroyed. What is helpful here is an old man who tells us that we can’t real Zolde’s castle without going to four towers and beating the bosses there. But Milfa’s power is necessary, so Olotria is next.

Sunken city Olotria

With Milfa joining the team, the final party is complete. Now that Milfa is with us, the old man in Dolun will give us the Black Key, to open the first of the four towers. Here it’s just four dungeons in a row — each one has a boss, the key to the next tower, and some of the ultimate equipment for our heroes. None of it is especially hard.

One of the towers

I used the same strategy on all these bosses — Power Powder to increase attack, and Arlaw’s defense spells, then poison. Then just attack and heal when necessary. The final dungeon is quite short, with a few sub-bosses that aren’t very difficult, and then Zolde himself. He has three forms, but none of them are very hard.

Zolde

After being defeated, Zolde vows to come back some day as all stereotype villains do, and the game is over.

This is pretty much the definition of an average RPG — it’s easy to pick up and play, has a few innovative features, an uninspired plot, and cookie cutter characters. Nothing special, but if you’re looking for old school RPGs it’s worth a go, and it has a translation patch.

SRPG Game 1 – Fire Emblem (Stages 15-19)

Stage 15 – Gadain, the Magic Country
“The evil bishop Garnef appears.”

Overall this stage isn’t too bad, but there are a couple of difficulties. The first one is that innate magic resistance does not exist in this game. So magic does the same damage to everyone unless you use the M Shield staff, or the permanent magic resistance item (one is in this stage). So unless you have these items, no one can really tank against magicians. However, they don’t do serious damage individually.

Garnef is at the right side of the stage, but as the helpful villager tells you, he cannot be defeated (according to the instruction manual we’ll take him out on stage 23).

Garnef leaves after a few turns, and the mage reinforcements around him stop. The only other difficulty is that most classes move slowly on the desert. But that’s not a big deal, and the boss goes down fairly easily.

After the stage, Gato speaks to Marth through magic. He tells the story of Garnef and Miloa, who were once his disciplines. But Garnef stole the Mafu magic and now has the Falchion — he surely hopes to control the world himself, without relying on Drua. Our only chance to beat Garnef is to find the Orb of Light and bring it to Gato, and then we will get Starlight Explosion, the only magic that can beat Mafu.


Stage 16 – The Fight in Altia
“Marth takes back his country, Altia.”

This stage has a strange character, Chaney, who is the Commando class. I believe this class is only in FE1 and remakes. He can copy any other character, although he retains his own inventory and can’t gain xp while copying.

Chaney

There’s really not too much to this stage. I just took my party south through the building with Chaney, and then around to the boss. There are villages at the top left to recruit either Samson or Alan (you have to choose one or the other), but Marth moves fast enough that I could send him off alone to do that and then catch up later.

Now Marth has taken back his kingdom, but he still has to clear the enemies out of the castle.


Stage 17 – Starlord Marth
“Marth frees Altia castle.”

This was a tough stage. I had to reset more times on this stage than in the rest of the game combined.

The left side of the map has a bunch of chests. The right side of the map has the boss, who cannot be hurt by magic. This leaves Dragon Killer swords the only really effective means of hurting him. The two priests on the right both hold important items (a Member Card and a Reserve staff, which heals all units for 10 HP). None of this would be terrible except that reinforcements begin to come out from the right of the priests on turn — three a turn for the next 40 turns.

Marth in the treasure room

The plan I eventually came up with was to warp Marth into the treasure room (you almost have to do this to avoid losing any chests to the thieves). Then part of my group would follow him, including Julian and Boa (who has the warp staff). Meanwhile Jeigan went to get a door key from the storage to open the door to the boss. After clearing out the enemies on the left side and getting most of the chests, I warped Marth next to the priests. He was able to then use his 11 move to mostly stay ahead of the reinforcements, get back around to the throne area, and receive a Dragon Killer sword from Astria. The other one I had went to promoted Kain, and they didn’t have much trouble taking down the boss.

A failure — this was the first time I tried the stage, before I was warping Marth into the treasure room

The problems I had were mostly beating everyone on the left side without losing anyone. I had one time where I had done it but I lost a person from full HP to a critical hit. Another time I did everything right but hadn’t yet realized I needed Dragon Killers, and couldn’t kill the boss. Finally everything worked out and I moved on. I did not use the secret shop behind the throne.

Marth running from reinforcements

So Marth has taken back his kingdom and castle. Unfortunately his sister Ellis is still with Garnef.


Stage 18 – The Black Knights of Gurunia
“Marth faces a fierce attack from the Grunia Black Knights on the bridge spanning Kashimia.”

This is another stage removed from the SFC version. After 17, it’s a breeze.

Except for one stupid loss when I just wasn’t paying enough attention, this was basically a matter of charging ahead and killing everything. I wanted to finish the stage before the reinforcements came out, but Est (a pegasus knight) joins here along with the Mercurius Sword, which is one of the best weapons for Marth. So I had to wait for her to catch up and face a couple of reinforcements but nothing too bad.

Est

As people on the Discord told me, she’s the last pre-promote unit to join but has excellent growth to compensate. But I already have a lot of P Knights. After the battle, Modorf warns us about going to Laman Temple because there’s a fierce goddess that will kill anyone who takes anything from it, but Marth needs something from there.


Stage 19 – Mamkute Princess
“Marth gains an important item at Raman Temple.”

This stage is fairly small and has few enemies (and no reinforcements, but there are some tricky aspects to it.

As you can see, the Snipers will interfere if you try to use thieves to open the doors, so they have to be beaten, or you can use some other hardier class with a Door Key. I did this for a few of them but then just killed the snipers after that. The important treasures in this stage are the Earth Orb, from one of the chests, and the Light Orb, which a thief holds. They play a mean trick by having another thief equipped with a Devil Sword. I wasn’t checking inventories and I got a nasty surprise and a reset.

The boss of the stage is Chiki, who Banutu told us about earlier. He can convince her to join and break out of her mind-control spell, so there actually isn’t a boss to the stage.

Aftewards, Nina tells us that before going to Grunia, we should try to talk to General Camus. Camus was the one who protected her years ago when Drua attacked Akaneia, despite Medius wanting her dead. She hopes that by talking to Camus we can get him on our side. So that’s the next destination.

SRPG Game 1 – Fire Emblem (Stages 10-14)

Stage 10 – Princess Minerva
“The fight at Teal Fortress.”

Marth sets out to save Maria in this stage.

The captive

I sent most of my force around the building to head for the boss, while Julian and a small group went in with Marth to save Maria. I left Kashim on the fort to the east thinking that would block the reinforcements, but they come from the top of the map rather than the fort. This left Kashim completely alone vs. them, and he died. It was late enough in the stage and Kashim’s not a great character so I decided to move on despite the death.

Once Marth saves Maria, Minerva the dragon rider heads towards him to join as well. She explains that although Macedonia has mostly joined up with Drua, she wants to fight against them. She urges Marth to save Kachua, Paola, and Est, her underlings who will help in the fight. The rest of the stage is easy, as Excalibur claims another victim.

This map also has the first promotion item. When characters of certain classes reach level 10, they can use an item like the Hero’s Proof to advance to a new class. This resets their level to 1, and raises their stats to the base values for the promoted class if they weren’t there already. I didn’t have anyone at level 10 yet but I gave it to Ogma to use later. There’s also a speed ring. I decided to give the stat up items in general to Marth, since he has no promotion, the Rapier is a good weapon, and enemies tend to target him.

Stage 11 – Slave City Norda
“Marth frees the slave city.”

Marth heads to Norda to save Linda, who has the powerful Aura magic. This stage has the first appearance of the curious Shooter class, which is only in this game and the two remakes of it. It’s an attempt to combine the Armor Knight and Archer class, which is a poor combination.

Shooter

The slave area is at the bottom right. After liberating it I spend quite a bit of time using the shops and storage unit to shift around items. Dealing with items is definitely one of the low points of this game; it’s far too difficult to trade and manage inventories. They should have offered a screen between games to do this.

After this I made a save state since I wasn’t going to repeat that again, and this is where I began using my “one save state per map” idea. I’ve found that this preserves enough of the tension and difficulty without having the extreme frustration of having to repeat 45 minutes of a map because of an unlucky critical hit or making one mistake in unit placement.

I did in fact have to reset once when I was a little too bold with my advancing and got swarmed. You can convince one of the shooters to join you, and the other one goes down easily with magic.

Now we have reached Akaneia, finally returning Nina to her home. But of course we’ll have to clear it of enemies first.

Stage 12 – Akaneia Palace
“The fight against Bishop Bozen in Akaneia Castle.” 

Another castle map. The trick here is that you can only send out 10 guys because there are a bunch of heroes imprisoned in the palace, with no items.


The enemies there aren’t too problematic because the archers can’t hurt the armor knights. So that leaves us free to make our way through the castle. Once the initial enemies were cleared, I decided not to take the direct route to the treasure. I left Julian near the door and took everyone else around the bottom.

I had to load a state at this point because that sniper has a Silver Bow that I didn’t notice, and took someone out in one turn. But Marth with a Thunder Sword made quick work of him, and of course those two clerics are no problem. Mages are a bit tricky because in this game, everyone has a magic defense of 0, unless you use one of the items to increase it. So magic essentially does fixed damage. Even so, Bozen can’t take too many hits before dying. That General in the treasure room can’t open the door so he’s easy to pick off with magic from the other side. The only other thing to do is beat a Paladin on the right, who has the subtle name of Himmler.

One thing you sometimes have to be careful about is leading with a character who is too strong. Because if they can kill the enemies in one round (with two hits), they’ll keep taking damage over and over again. This game doesn’t let your guys’ stats easily get too high, and so someone can die pretty quickly if you’re not careful.

After the stage, Nina gives us the bow Palutia, which has a limited number of uses and a high weapon level requirement. There are two other good weapons like it: the Gladius, and the Mercurial Rapier, that we should come across later.

Stage 13 – The Wooden Horse Army of Gurunia
“The army encounters the Gurunia Army in Menidi.”

This stage was cut from the SNES re-release and it’s not hard to see why. 15 Shooters. Fifteen.

Some people use warp staffs to deal with the stage. What I did was go forward on the middle path, taking out the shooters there, and taking Marth to the village to recruit my own shooter (who can’t leave the cliff area he’s stranded in). Media recruits Astria, the swordsman. Now I had this position:

I had given Marth the Boots from a previous level so his move is 11. Marik moves forward and kills the Shooter boss with Excalibur, then Marth moves to the castle and takes it over, obviating the need to deal with that wall of shooters in the back or the shooter groups at the top and bottom.

Stage 14 – Gura, the Land of Sorrow
“Marth attacks Gura, the land that betrayed Alitia.”

As given in the intro story, Gura is the land that betrayed Marth’s father. Although Marth doesn’t have any dialogue in this map so I guess you have to invent your own story of his revenge.

After getting the magic spell from the village on the top left, the next step is to take out all those annoying archers and the priest. Meanwhile Kachua and Paola appear on turn 5 and head towards Marth, joining the team.

I guess I took too few screenshots of this stage. The bottom part of the map seems easy, but I actually had to load my mid-save stage twice. Once was because the Armor Knight got a critical on Abel and took him from full HP to 0 in one attack. The other was due to the Pegasus Knight reinforcements that start coming in from the left. They do a fair amount of damage; probably if I had shooters out there they could tank it. Winning the stage before too many of them come is easy enough, but the right side has two chests, including the all important Silver Card, which halves the price of items. The tedious and cumbersome item interface makes this less appealing than it would otherwise be, but it’s still a good item.

So we have now taken back Gura, but the Falchion is not there. Apparently Garnef has taken it and fled, so it’s time to follow him to the desert — we can’t beat Medius without the Falchion.

SFC Game 27 – Silva Saga II

Silva Saga II (シルヴァ・サーガⅡ)
Released 6/25/1993, published by SETA


This is the third game in a series with Minelvaton Saga and Silva Saga I, and also has connections to GDLeen. All of them had scenarios by Yuto Ramon. The backstory in the manual is pretty standard for RPGs — a world with the Light God Harn and the Dark God Zuhl (who was the final boss of GDLeen, at least an avatar of his). Harn won a huge war and ushered in an age of light, but Zuhl continues to affect the world and so heroes of light need to arise occasionally to defeat Zuhl’s forces.

Part of the backstory

The Dark Prince Lagon was defeated by Prince Leon of the Palmekia kingdom, in a story told in one of the novels. Then in Silva Saga 1 (for Famicom), Leon’s grandson Kairal used the Sword of Light to once again defeat the darkness. This time, our hero is Kurisu (or Palsu in the instruction manual), who has washed up on the shore in Beta, a small village on a small island. Unfortunately the forces of Zuhl are attacking even here. Fortunately the woman who finds him gives him some basic equipment. He has amnesia and only remembers one thing: he needs to find Kairal, the Prince of Light who defeated Lagon (I think).

Kurisu awakes

The game looks a lot like Dragon Quest. The interface is clean and easy to use for the most part. You can see what the strengths of weapons and armor are when you buy them! You can search most things in towns and houses, and a lot of them give funny or interesting messages if there’s nothing there. Sometimes you feel bad (I stole 120 gold from a house where the sick grandmother was being tended to by a daughter who had to work to support her).

The status screen

The opening town has no weapon shop, but it does have a mercenary hiring location, where I picked up my first companion, Elmina.

Hiring a mercenary

You have three different parties that you can switch between in battle. Any switch automatically gives the monsters a turn. You have:

  1. Your main party, which is the usual RPG party.
  2. Mercenaries, who you hire at a mercenary place. As far as I can tell you never have to pay them again. They can only attack a random enemy, but recover all HP after a battle. If one of them dies, they’re gone permanently.
  3. Jinzo (god statues). You find these in chests, and when they’re high enough level you can combine them with other statues to make a new one. Like the mercenaries, you can’t control them and they casts spells, and recover all HP/MP at the end of a battle. If they die they can be revived just like a normal party.

Only the currently selected party gains XP at the end of the battle. You can’t heal the mercenaries or the jinzo during the battle. But this does give some interesting dimension to a system that’s mostly just the basic AMID, although I have found that due to all your different party members, the mages have enough MP to actually use their spells. The main irritation is a system that I really hate — when the main character’s HP go to 0, it’s automatic game over even if everyone else is alive. Fortunately death in this game is not a big problem; you get returned to the last place you saved your game but with no penalty (other than being removed from wherever you were). This is a good offset for the annoying luck that the main character death system can introduce.

The first task is to do a little job for the mayor of Beta to prove yourself, and then he’ll give Kurisu his canoe.

A battle

Now with the canoe, Kurisu is able to set out on his quest to find Kairal. One odd feature of this game is how quickly people join and leave your party. Eventually (over halfway through) you get your final party, but before that it almost makes you dizzy how often people rotate. They share their skills and levels with the next person but you lose whatever you have equipped on them.

Lisa, your first party member

Unfortunately this also means the characters are very underdeveloped (including the silent protagonist). The basic flow of the first part of the game is that Kurisu travels to a place hoping that Kairal will be there, only to hear that he’s moved on. Generally there’s some quest or dungeon to solve and then he’ll be able to pass the next roadblock, or be given a warp item to go to another place.

A fight with 4 party members

Along the way, Kurisu learns that the Zuhl activity is now being handled by Zolde, the older brother of Lagon, who is also stronger than Lagon. Finally, he discovers that Kairal was killed by Zolde, but that Kairal knew another “hero of light” candidate was following him. He leaves behind a message for Kurisu, to find the Equipment of Light in order to be qualified to become a new Hero of Light. This just involves going to three different dungeons and getting the shield, sword, and armor of light (none of which can be equipped). Then we head to a shrine where the god Harn appears and grants Kurisu the power of the Hero of Light.

Becoming the Hero of Light raises Kurisu 10 levels, and also grants a new sprite (although the face picture on the status screen is the same).

A new man

Now all that remains is to kill Zolde, but of course it’s not that easy. We still have the problem of Kurisu’s loss of memory, and how can we break into the castle where Zolde is? Stay tuned!

SRPG Game 1 – Fire Emblem (Stages 5-9)

Stage 5 – The Warriors of Orleans
“Marth meets up with Hardin’s warrior band, who is fighting to protect Princess Nina of Akanaia kingdom, in a fortress near Orleans castle.”

There are two difficulties in this stage — making sure none of the thieves can reach the village in the north, and having all the new members of Hardin’s group survive the stage. Neither are extremely hard but I did have to restart a few times. Hardin’s group is not very strong and it takes some proper placement to make sure the archers can’t combine with the armor knights to take down one of them.

Once the thieves are defeated and the Archer/Armor Knight group taken care of, the rest of the stage is not very hard. Wendell, a Bishop, comes to Marth and joins. Although there are a lot of strategy RPGs with enemy characters that can be persuaded to join your side, I don’t know how many there are where the enemies actually approach your own troops and join on their own.

Reinforcements (a single Social Knight) come out of the fort at the top if you take too long. I used the magicians to take down the Armor Knight.

Stage 6 – Fire Emblem 
“A fight inside Orleans castle. After winning this fight, Marth pledges to Princess Nina to defeat the Drua kingdom and free all the lands of Akanaia. He sets out on his journey.”

This was a tough stage for me. The main problem are the treasure chests. There are 5 of them, and four thieves on the stage that can go loot them. Unlike later FE games, defeating the thieves after they steal the chests does not give you the item. Two of the chests are impossible to get without using Lena’s Warp Staff, and I decided to ignore those. I would have liked the Angel Clothes to increase max HP, but I don’t know how many warp staves there are in the game. I also wasn’t sure who was strong enough to send over there in the midst of the enemies — I found a Japanese blog where the guy used Wendell to get the Angel Clothes. I guess that makes sense; he has a high defense and can do a lot of damage to the armor knights.

Even getting the other three chests was tricky, though. I kept losing guys to gangups by the archers, the social knight with the gold sword, and the magician at the top left. I think the above picture is from the time I actually won. I finally got down and closely investigated everyone’s stats so that I knew who could best defend against the attacks. Julian also recruits Ricardo, giving me a second thief.

Once the chests are done, there’s still the problem of the two archers and magician in the final room. I approached very slowly, killed one archer, and then fortunately the other archer and magician came forward when they could not attack anyone. This made it easy to finish them off, and Wendell and Marik’s Excalibur magic finished off the boss.

Now Marth has the Fire Emblem, which will help him open a future chest that is important for the journey, and the first major section of the game is done.

Stage 7 – The Trap at Lewakandi
“In the valley of Lewakandi, Marth encounters the White Knight group of Minerva, but…”

Minerva decides that Macedonian troops should not be serving Drua, and defects with three of her pegasus knights. This draws down the forces here to a reasonable number and makes the stage pretty easy.

A few archers were enough to take out the remaining D and P Knights, leaving just a skeleton force defending the base. The boss, once again, I beat with Marik’s Excalibur. That won’t last for the whole game, though.

This stage also gives me the first Mamkute, Banutu. He tells us that we need Chiki, another Mamkute, to have any chance at defeating the other Mamkutes who serve Medius. He lost his stone, but fortunately I picked one up in the last stage. With the stone he gets a big defense boost and an attack that never runs out — pretty nice! The ending dialogue of this map just summarizes the story that was already given in the instruction manual.

Stage 8 – Port City Warren
“Marth is surrounded by a large army at Warren.”

The goal in this map is basically to escape to the right and take over the castle; there are large numbers of reinforcements. Some people might fight them all for experience but I finished the stage before I got overwhelmed. I accidentally set up a situation where the horsemen could not move or attack, blocking that area from further reinforcements.

My new recruit Banutu dealt well with the armor knights, who really couldn’t hurt him. Excalibur once again finished off the boss.

The funny part of this stage is Sheeda’s recruitment of Roger. She asks him if he believes in love and if he has anyone special in Gurunia — after a while they have to stop talking and Roger is smitten as so many other men in the game are.

Stage 9 – The Dragon of Perati
“The fight against Commander Manu, the Mamkute.” 

This is another stage that was cut from the SNES remake. The boss is a Mamkute, but gets taken out with Excalibur — I’m definitely going to run out of uses of this before the end of the game. The main trick of this stage is getting the chests. The two closest to the start are easy because the thieves go for the town instead, and you can easily head them off.

 The harder one is at the bottom right — not because of the thieves, but because at turn 10, pirate reinforcements start coming out at forts at the bottom of the map.

I decided the Dragon Killer was not worth it and just finished the stage.

At the end of the stage, one of Minerva’s P Knights, Kachua, asks for help — Minerva’s sister Maria has been captured by Drua. Minerva is rebelling against Drua but they want our help saving Maria. And off we go!

16 stages to go.

SRPG Game 1 – Fire Emblem (Stages 1-4)

Stage 1 – Marth Sets Out
“Talis, where Marth has retreated, is attacked by pirates. Sheeda comes to request help from Marth, and he sets out to retake the castle.”


This is a well-designed starting map — it’s short and fairly easy,  but not so easy that you can just do whatever you want and win. It lets the player practice without having to repeat too much if they fail. There are some potential pitfalls that prepare you for later maps, such as letting Sheeda get in range of the archers or not killing the thief before he destroys the town. The main potential danger for a new player is relying on Jeigan too much. Before I even started playing any FE I knew about avoiding the “Jeigan character” because of their low stat growths. [EDIT: Apparently this is a common misconception, and the Jeigan characters are actually quite good to use.]

The starting group: Kain, Abel, Marth, Sheeda, Jeigan, Gordon, and Dorga

I actually did use Jeigan some on this map to weaken the enemies, but I accidentally killed the boss with him. This is not as big of a deal as I thought — I don’t know if this is a consistent feature of many FE games, but in this game, the XP given by an enemy is fixed by their class, and a small bonus for their level, with perhaps another small bonus if they’re the boss. I don’t think your own level makes any difference.

Other than that, I made sure to recruit Rifu from the house and get the 10K gold from the first house, and I bought a few extra weapons.

Stage 2 – The Galda Pirates
“Marth sets out for Orleans to meet with Princess Nina of Akanaia, who is already fighting against the Drua Kingdom. On the way, he is attacked by pirates.”


This is another fairly easy stage. It starts by getting 4 new axe users as companions. One of the pirates to the north will approach Marth and join the good guys on his own. There are two thieves but they can’t really get off the island to destroy towns unless you really screw up.

The only other thing to do on the stage is recruit Kashim with Sheeda. It’s obvious to do this because when he attacks, he asks Sheeda to forgive him (he needs money for his mother’s medicine). Since Kashim is an archer you have to be careful. Whenever you have a recruitment conversation with the enemies, there’s a BGM that I mostly associate with the FE stages of Super Smash Brothers Melee.

A battle scene — they are unskippable, but you can turn off the animations.

One other note: I don’t read strategy information beforehand unless I’m really having problems but sometimes I’ll look at it afterwards. Apparently you can leave one of the thieves alive, and set Rifu on a fortress. The thief will attack him over and over again — in this game, clerics gain XP by getting attacked. If they survive the attack they get XP equal to defeating the monster. So with this you can easily level Rifu up to 20. I tried this on other stages but I couldn’t get the thieves to attack him.

Stage 3 – Devil Mountain
“A fight with the Samshian Bandits, who live in Devil Mountain, directly in front of the Orleans Plains.”

This is the first stage I had to restart several times. The characters at the top are Julian and Lena, two important people that you want to keep alive. Fortunately they can stay ahead of the pursuing enemy troops. The big problem is Navarre, the mercenary above the fort. He can be recruited with Sheeda, but he has a Kill Sword, which increases critical rate. This plus the danger of the archer meant I had to try a few times before I got everyone in the right position to pull it off. After this the rest of the stage is more of the same stuff. The house gives a Devil Axe, which no one can use yet, and I’m not sure if I actually do want to use it.

Stage 4 – Fight on the Plains 
“In order to take back the Orleans castle, the team fights against the Macedonian army on the Orleans plains.”


When this game was remade and repackaged with a sequel for the Super Famicom, 5 stages were removed from the FE1 portion. This is one of the stages. It’s the first one where you have to select which characters to use. I’m going the cheap route and mostly using the characters with the highest total growth rates, although I did keep Jeigan along.

I had to restart the map once because I didn’t know thieves could cross rivers. There’s one at the top that will reach the town if you don’t go after him, so rather than staying in the starting location and waiting for the troops, I had to go after them.

One of the houses has Machik, the first mage, who comes with his unique Excalibur magic as well as blizzard. Having characters that can attack from range 2 is nice but you do have to be careful — the boss has a javelin and can counter from 2 range.

The only other potential trouble spot is recruiting Machis. You have to talk to him with Lena, the weak priest, and sending her into the middle of the enemies before other people have a chance to kill Machis could be tricky. I was able to do it in one try, though.

So far I’m having fun with the game. As I said, the tension of this game is high since a single bad move can lose you a character permanently. It’s a bit like Wizardry or some roguelike games. In the past, I have always gotten frustrated by the permadeath and quit FE games before I beat them. I’m hoping that the structure of a chronoblog like this will encourage me to finish them. I considered allowing some soft cheating like “1 save state per stage” but at least for now I’m not going to do this.

Let me know about your experiences with this game or any comments on what you’d like to see in the posts, and thanks for reading!